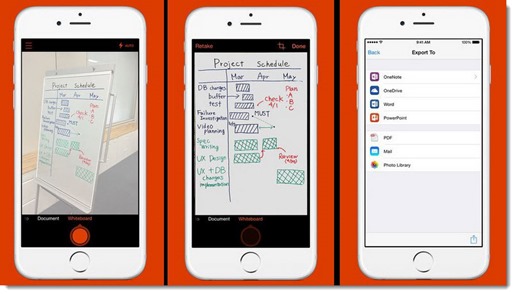
Last week Microsoft made Office Lens available for iPhones and Android phones. It’s a free app that turns your phone into a fast and efficient scanner, able to easily capture documents, business cards, receipts, whiteboards, and more. It’s practical and useful and does some great magic tricks to make the process easy.
How To Get Office Lens
The iPhone version of Office Lens is available in the Apple Store. (There is also an iPad version that installs directly into OneNote – click here for more details.)
The Android version is a preview that requires an extra step. Go to this Google+ forum, log in with your Google account, and look for the instructions on the right. After you “join the community” on Google+ and click on the link to “become a tester,” you’ll be able to click the Office Lens Preview link to install it from the Google Play Store.
This has been available to Windows Phone users in the Windows Phone Store for a year, and both users have enjoyed it.
How To Use Office Lens
When you start Office Lens, the camera comes up. There’s a button at the top to choose Document, Whiteboard, or Photo. Normally you’ll use Document.
Point the phone at something with square corners – a receipt, a business card, a piece of paper. It doesn’t matter if you have it centered or if there are shadows on it. You’ll see Office Lens outline it. (You can change the cropping if it doesn’t get it right.)
When you click the shutter, Office Lens immediately crops the photo to the edges of the document, rotates it, sharpens it, straightens out the perspective if you were at an angle, and removes shadows and glare. All of a sudden the whiteboard is clear and centered, the business card is rotated, the document fills the screen. Magic!
Click Save or Done and you’ll be given a choice.
You can save it into OneNote, where it will appear in the Quick Notes section of your Personal notebook. OneNote will do OCR on the image so the words are searchable. (Not using OneNote yet? Tut, tut. I’ve been trying to make you understand what you’ve been missing. Use OneNote!)
If you click on OneDrive, the image is saved as a JPG in OneDrive\Pictures\Office Lens. That’s not the best choice for documents, though.
If you click on PDF, it’s saved as a PDF in OneDrive\Documents\Office Lens, after doing OCR so the PDF can be searched and text can be highlighted and copied.
Even better: click on Word and the picture will be converted into a Word DOCx file, with OCR done so it’s ready for editing. It’s also stored in OneDrive\Documents\Office Lens. You can edit it on the phone if you have Word installed, or work on it later on your computer or tablet.
You can email it with a single click on Mail.
Seriously, isn’t that great?
Expect improvements as Microsoft continues to tweak these new versions. At the moment you can’t choose a specific section in OneNote or a particular folder in OneDrive to receive the file, and it can’t do multi-page scans. I’d expect those to be added sooner or later.
Take a minute and a half and look at this promotional video about Office Lens.
Then give it a try. You might discover that Office Lens becomes your new best friend.


If you want to turn your phone into a fast and efficient scanner that easily captures documents, business cards, receipts, whiteboards, and more…please go through the above article. It’s a one-stop solution for all your scanning issues.
Both users !!!!! ROFL!